1 Scope
This part of IsO 8458 specifies general requirements for steel spring wire of round cross-section, suitable for the manufacture of mechanical springs.
2 Normative references
The following normative documents contain provisions which, through reference in this text, constitute provisions of this part of ISO 8458. For dated references, subsequent amendments to, or revisions of, any of these publications do not apply. However, parties to agreements based on this part of ISO 8458 are encouraged to investigate the possibility of applying the most recent editions of the normative documents indicated below. For undated references, the latest edition of the normative document referred to applies. Members of Iso and IEC maintain registers of currently valid International Standards.
ISO 377:1997, Stee/ and steel products一Location and preparation of samples and test pieces for mechanical testing
ISO 404:1992, Steel and stee/ products – – General technical delivery requirements
ISO 3887:- _1), Steels一Determination of depth of decarburization
ISO 4885: 1996, Ferrous products – Heat treatments – Vocabulary
ISO 6892: 1998, Metallic materials一Tensile testing at ambient temperature
ISO 7438:1985, Metallic materials – Bend test
ISO 7800: 1984, Metallic materials一Wire 一Simple torsion test
ISO 7802: 1983, Metallic materials – Wire – Wrapping test
ISO 8458-2, Steel wire for mechanical springs一Part 2: Patented cold-drawn non aloy steel wire
ISO 8458-3, Steel wire for mechanical springs一Part 3: Oil-hardened and tempered wire
ISO/TR 9769:1991 Steel and iron – Review of available methods of analysis
ISO 10474:1991 Steel and stee/ products一Inspection documents
ISO 14284:1996 Steel and iron 一Sampling and preparation of samples for the determination of chemical
composition
3 Terms and definitions
For the purposes of this part of ISO 8458, the fllowing terms and definitions apply.
3.1
cast
geometrical shape (characterized by overall diameter and helical separation of ends) adopted by a single ring of wire when cut from the coil
3.2
patented cold-drawn wire
wire drawn to size by cold deformation of a starting material that has been subjected to a thermal treatment of patenting
[ISO 4885:1996]
3.3
oil-hardened and tempered wire
wire that has been heat treated in line firstly by being transformed into austenite, then quenched in oil or other suitable medium and finally tempered at an appropriate temperature
3.4
static duty
applications where springs are subjected to static stresses or infrequent dynamic loading, or a combination of both
NOTE
This does not apply to situations of low-frequency high stress.
3.5
dynamic duty
applications where springs are subjected to frequent or predominantly dynamic loading and where a small coiling ratio or severe bending radius is required
3.6
ring
one turn of wire from a coil, i.e., one complete circle of wire
NOTE
A ring of wire does not imply any specific length of wire or diameter of wire.
4 Information to be supplied by the purchaser
The purchasers shall clearly state the fllowing information in their enquiries and orders:
a) the desired quantity;
b) the number of this International Standard including the number of the relevant part, i.e. ISO 8458-1, ISO 8458-2 or ISO 8458-3;
c) the wire grade, surface finish and coating where relevant;
d) the nominal wire diameter;
e) the form of delivery and unit mass;
f) the type of inspection document (see 6.12);
g) any particular agreement made;
EXAMPLE:
– 5 t spring wire ISO 8458-2- SM-2,5 phosphated
– inspection document ISO 10474-3.1.B
– on spools of about 500 kg.
5 Requirements
5.1 Dimensional tolerances
5.1.1
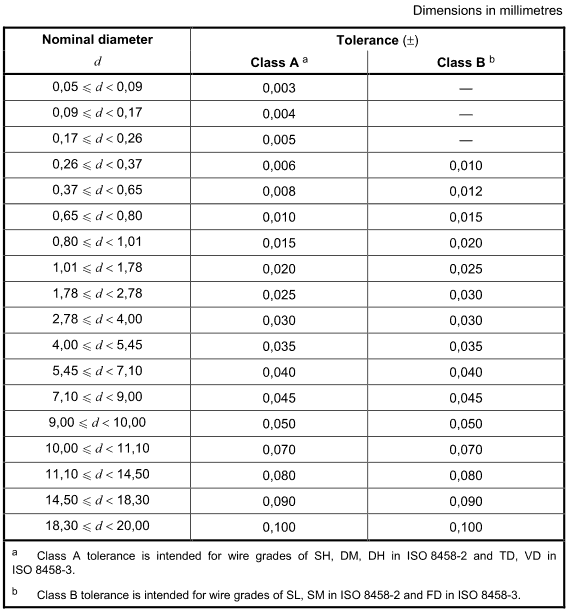
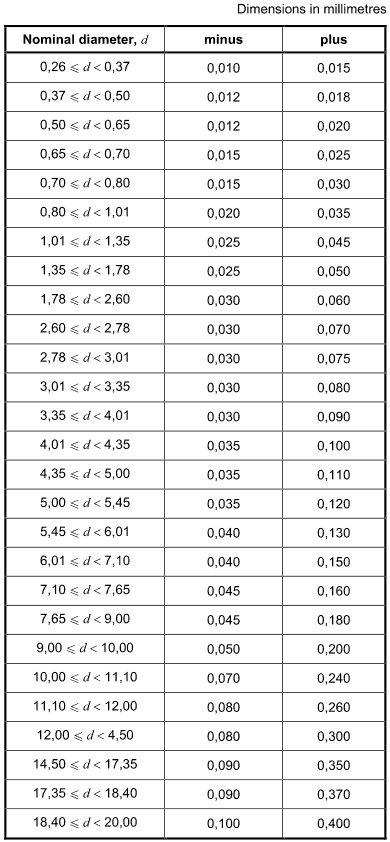
Diameter measurements shall be made at any cross section and shall not differ from the tolerances
specified in Table 1 or Table 2, as appropriate.
For straightened and cut lengths, there is only one tolerance level derived from class B.
Table 1 – Diameter tolerance for coiled wire

Table 2一Tolerance for straightened and cut lengths

5.1.2
The out of roundness (ovality), that is the difference between the maximum and minimum diameter of the
wire at the same cross section, shall not be more than 50 % of the total tolerance range for that diameter.
5.1.3
The requirement for the length tolerance for wire in cut lengths shall be as specified in Table 3.
Table 3一Tolerance on the length of cut lengths

5.2 Surface quality
The surface of the wire shall be smooth and as free as possible from grooves, tears, rust and any surface
discontinuities that may have a noticeable adverse effect on the application of the wire.
For details see ISO 8458-2 and ISo 8458-3.
6 Inspection and testing
6.1 General
When agreed at the time of inquiry or order, one of the inspection documents in accordance with ISO 10474 may be submitted (see 6.12). Where specific inspection and testing are required, the requirements given in 6.2 to 6.11 apply.
6.2 Selection and preparation of samples and test pieces
The general conditions given in ISO 377 and ISO 14284 for the selection and preparation of samples and test pieces shall apply.
Samples for all required tests shall be taken from the end of the coil or cut length, as appropriate.
All mechanical tests shall be carried out on fll-section test pieces.
6.3 Chemical analysis
In cases of dispute, chemical analyses shall be carried out in accordance with appropriate International Standards (see ISO/TR 9769).
If no Intermational Standards are available, the methods shall be agreed upon at the time of inquiry and order.
6.4 Tensile test
The tensile test for the determination of tensile strength and reduction in area shall be carried out in accordance with ISO 6892. The tensile strength shall be calculated using the actual wire diameter.
6.5 Wrapping test
The wrapping test shall be carried out in accordance with ISO 7802.
6.6 Coilling test
The coiling test shall be carried out in the fllowing manner:
A test piece, approximately 500 mm in length, shall be closely wound, under slight but reasonably uniform tension on a mandrel, three to three and a half times the nominal diameter. The mandrel diameter shall however be at least 1 mm.
The closed coil shall be stretched so that after releasing the stress, it sets to approximately three times its original length.
The surface condition of the wire and the regularity of the spring pitch (and individual windings) shall be inspected with the test piece in this condition.
6.7 Torsion test
The torsion test shall be carried out in accordance with ISO 7800. The speed of testing shall not exceed one turn per second.
6.8 Bend test
The bend test shall be the single bend test carried out in accordance with ISO 7438.
6.9 Diameter measurement
The diameter shall be measured using a micrometer or any other appropriate device at the same cross-section on a straight piece of wire.
6.10 Surface quality test methods
6.10.1 Deep etch test
The deep-etch test shall be applied to wires of 2 mm nominal diameter and over. Test pieces from cold drawn wire shall be given a stress-relieving treatment prior to the deep etching test. The cold test pieces shall be immersed in a solution of 50 % (V/V) of concentrated hydrochloric acid and water at a minimum temperature of 75 °C. The etching shall be finalized after a reduction in diameter of about 1 %.
In cases of dispute, metallographic examination shall be used.
6.10.2 Eddy current test
Where in line eddy current testing is specified or agreed between the parties, the conditions for the test and the
evaluation of results shall also be agreed.
6.10.3 Decarburization
The depth of decarburization shall be inspected metallographically. Evaluation shall be performed on the
transverse section of test pieces etched with nital and under magnification of x 100 to x 200 in accordance with IsO 3887.
The depth of decarburization shall be the mean of 8 measurements at the ends of four diameters located at 45° to each other starting from the zone of maximum decarburization and avoiding starting from a zone with a surface discontinuity.
The maximum single value of decarburization shall be recorded in addition to the average value.
6.11 Retests
For retests, the requirements of Iso 404 shall apply.
6.12 Inspection documents
Iso 10474 is valid, inspection documents being:
a) certificate of compliance with the order or
b) test report or
c) inspection certificate or
d) inspection report.
7 Marking
7.1
The general conditions for identification and marking contained in ISO 404 shall apply.
7.2
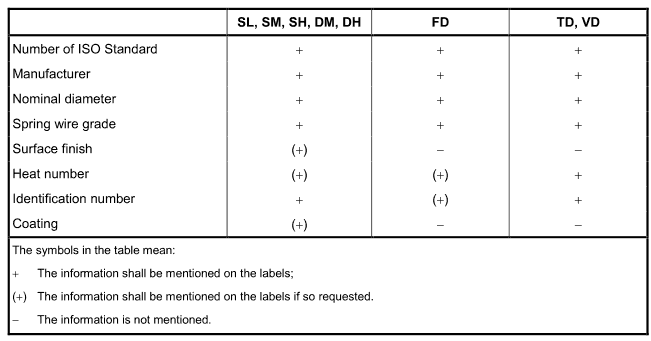
Unless otherwise stated in the order, the information listed in Table4 shall be shown on a tag securely
attached to each coil or bundle of lengths:
Table 4一Tag information about the spring wires

8 Complaints
The conditions for dealing with complaints laid down in ISO 404 shall apply.
